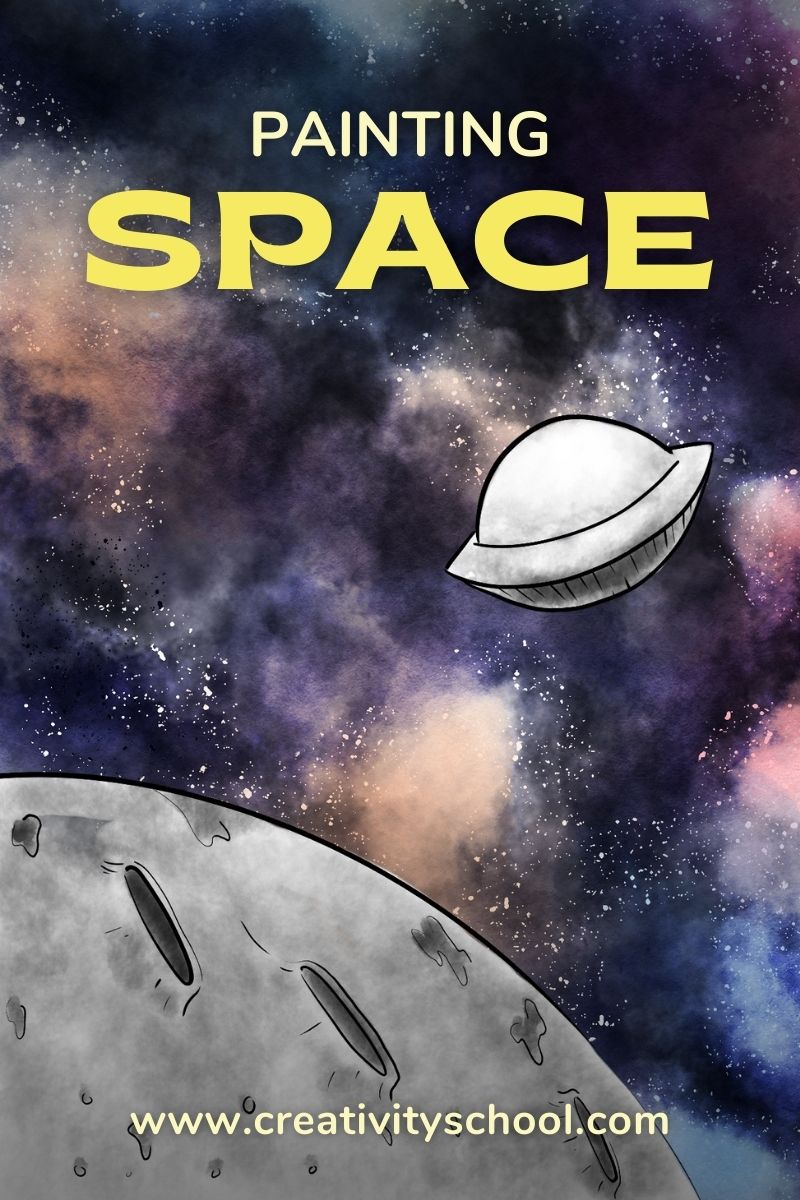
Wonderful Space Painting with Watercolors in 4 Easy Ways
Today, we’re going to play with watercolors and create a beautiful space painting using four different techniques!
This fun activity brings the beauty and magic of watercolors, and it comes with an easy-to-follow guide for kids of all ages.
Bring out your paints, and let’s start!
Recent Posts
Learn How To Draw and Paint at Creativity School!
Let’s begin the creative journey of your kids and enhance their potential this 2021!
Our award-winning artists give away free LIVE art classes from the Creativity School.
Learn how to make collages, animations, pop-up cards, draw ninjas, characters, paint, and much more!
Painting with Watercolors
Watercolor paintings by our young artists at the Creativity School
Watercolor painting is a beautiful and fun art form for everyone – especially for our young artists!
I love playing with watercolors, too. The cool thing about this art form is kids don’t need to be extremely good at painting the details to enjoy the magical results.
Kids simply enjoy the process of painting and watching the colors magically turn into something special and beautiful.
It’s so much fun!
Our good friend, Jessixa Bagley, specially crafted this wonderful space painting with watercolor and demonstrated this easy step-by-step guide in one of our free classes at the Creativity School.
Watch our quick video tutorial and see how Jessixa showed the wonders of painting with watercolors, and how she used four different techniques to create four different galaxy painting masterpieces.
This is a perfect painting activity to bond with your kids and the whole family!
Don’t forget to share your wonderful painting in our Creativity School Facebook Group!
Enjoy happy drawing and painting, young artists!
Materials
- 4-6 pieces of medium to large watercolor paper
- 1 watercolor paint set (preferably tube)
- 2-3 cups of water
- 2 palettes or plates for mixing (do not use paper plates or really dark plates)
- 2 paintbrushes – 1 large and 1 small
- 1 pencil
- 1 eraser
- 1 ruler
- Paper towel
Instructions
Part I. Prepare your palette.
You will need a lot of:
- Black
- Blue
- Purple (you can mix your own purple or use a pre-made purple)
You will need a little bit of this:
- White (separate this)
Squeeze out a little bit of the paints in the palette, then add water
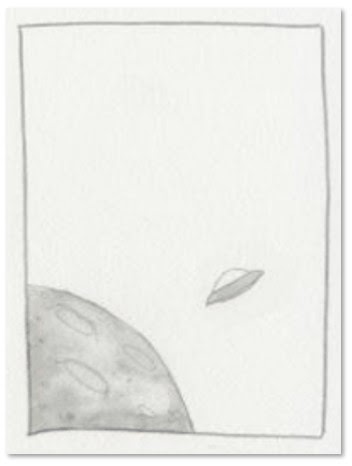
Part II. Draw and paint the moon and the spaceship.
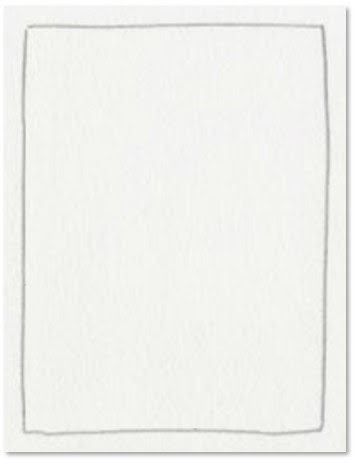
Step 1. Draw a rectangle on our watercolor paper.
It will give us a framed space for us to work.
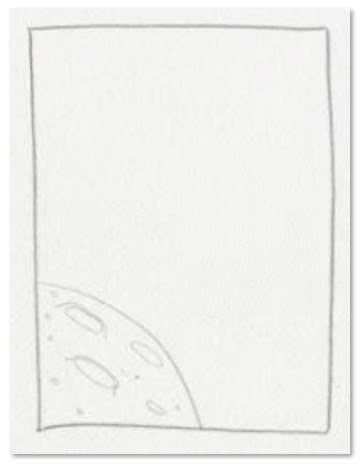
Step 2. Draw the moon on the lower left side of the paper.
First, draw a curved line from the left border to the bottom edge.
Then, draw 2 to 3 medium-sized ovals inside the space for the crater. Draw even smaller ovals for added textures.
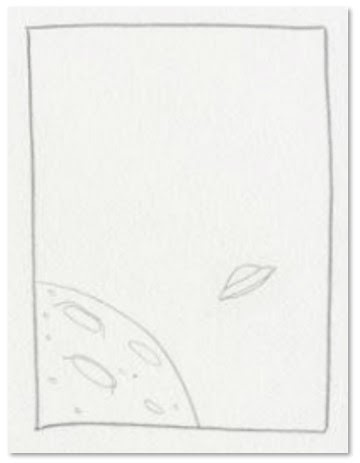
Step 3. Draw a spaceship.
Draw the spaceship using ovals and curved lines.
You can create your own spaceship, too!
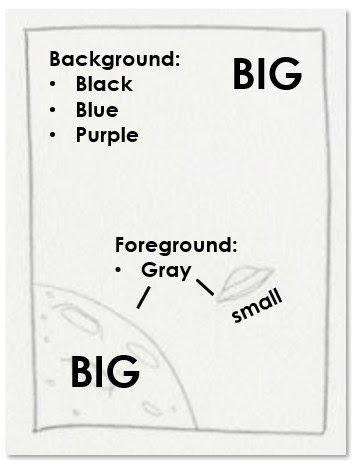
Step 4. Identify the color, size, and placement of the objects that you will paint.
Think about what elements in your piece are light in color and dark in color.
You also need to think about the objects that are big and small.
Lastly, think about which objects are in front and which at the back.
When you already identified those, here’s how we are going to paint:
- Big to small
- Back to front
- Light to dark
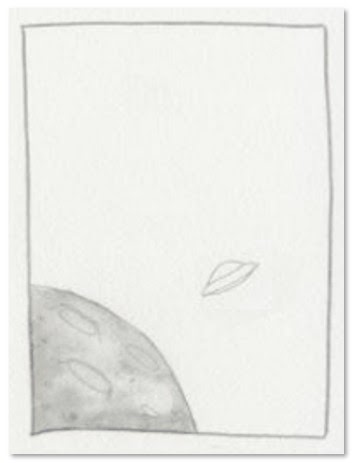
Step 5. Paint the surface of the moon.
Add water to a small amount of black watercolor paint to make it gray, then paint the moon’s whole surface.
Then, paint the craters with a darker gray.
Let’s do the wet-on-wet technique!
While it is still wet, you can dab a small amount of black watercolor paint anywhere on the surface of the moon, then let it spread out.
Step 6. Paint the spaceship.
With a small brush, paint the middle and the bottom part of the spaceship gray.
Now that you know how to draw and paint the moon and the spaceship, make 3 more copies of it.
Let’s try four different watercolor techniques to paint our vast space!
Part III. Experiment with Plastic Wrap.
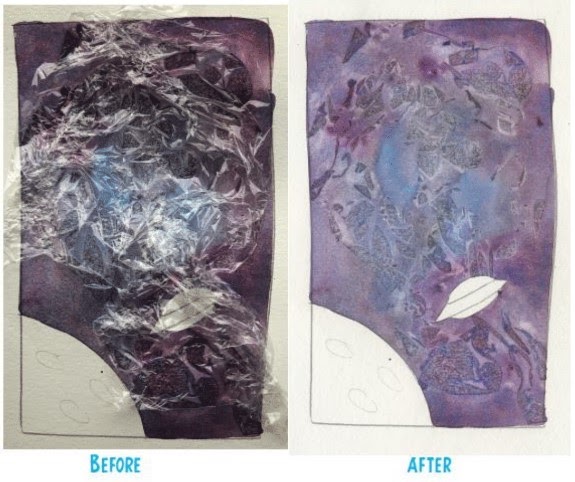
Step 1. Paint the background.
Paint and mix together the black, purple, and blue watercolor paints around the moon and the spaceship.
Step 2. While wet, crumple up a plastic wrap and stick it to the wet paper.
If you do not have plastic wrap, you can use tissue paper that you can dab lightly on your watercolor painting while still wet.
Try to move your tissue using different motions to create cool patterns.
Step 3. When dry, peel off the plastic wrap.
Peel the plastic wrap as carefully as possible.
Part IV. Experiment with Water Drops.
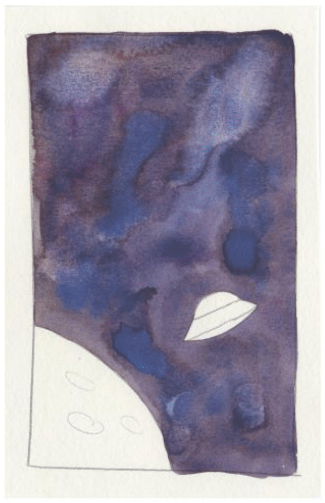
Step 1. Paint the background.
This is basically similar to the step on how you do the background in our first experiment with plastic wrap.
Step 2. Apply water drops using an eyedropper.
Wait for your painting to dry a little bit, then drop water droplets using an eyedropper anywhere in your vast space.
If you do not have an eyedropper or any form of dropper, you can simply use a paintbrush. Dip it in your bowl of water, then squeeze out water droplets into your watercolor painting.
Be careful not to add too much water in your painting, or you will not be able to see the magical effect!
Step 3. Let dry.
Be careful not to move your painting around or the excess water will drip off the paper.
Part V. Experiment with wax.
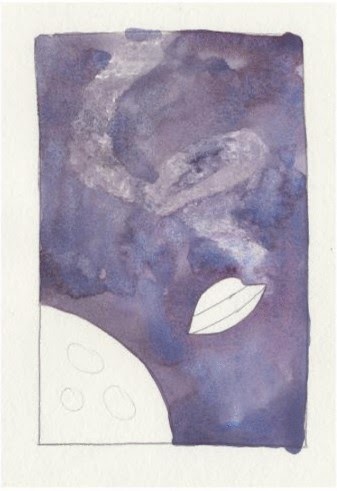
Step 1. Draw a spaceship track using a white crayon.
If you do not have a white crayon, you can use a candle or any form of solid wax to draw the spaceship track
Step 2. Paint the background.
Do not put too heavy watercolor paints on the waxed parts.
Step 3. Let dry.
Once dried, you can see that the spaceship track was not painted. This is because the wax repels the water from your paint.
Part VI. Experiment with salt.
Step 1. Paint the background.
This is the same step as how you did your background paintings from our previous experiments.
Step 2. While still wet, sprinkle salt on the wet paper.
Salt is a fun, experimental medium to use in watercolor painting.
The salt crystals absorb the color around it gradually, creating small star-like texture.
Experiment with different types of salt: table salt, sea salt, rock salt, kosher salt, and many more!
Step 3. Let it dry completely.
It is very important to let your painting dry completely before you rub away the remaining salt.
Part VII. Experiment with stars.
Lifting the Stars
Step 1. Take a small wet paintbrush and dot water on any of your space paintings.
Step 2. Dab wet dots with a tissue or a paper towel to lift the paint.
Be careful not to smear the water into your painting! Simply press the tissue or paper towel on the wet dots, then lift the paint.
Painting the Stars
Step 1. Mix white watercolor paint with a small amount of water.
We should have a thicker mixture of the white watercolor paint.
You can also use white acrylic paint or white gouache paint.
Step 2. With a very small brush, dot on the stars all over your space painting.
Wow! You’ve just painted different beautiful and breath-taking outer spaces! Great job!
Tips for art-mazing success
- Don’t be afraid to get messy and wet! It’s a part of your creative learning!
- I highly suggest you use watercolor papers because it has the right quality for your watercolor painting journey!
- Do not add too much water to your painting! This will significantly affect the color and the quality of your paper. Instead, use only a medium amount of wetness in your brush to make the watercolor look nice, rich, and solid.
- When starting to apply the paint, start as light as possible. Then, work your way towards the darker tone by adding layers.
- Use napkins or paper towels to remove any paint from your brush.
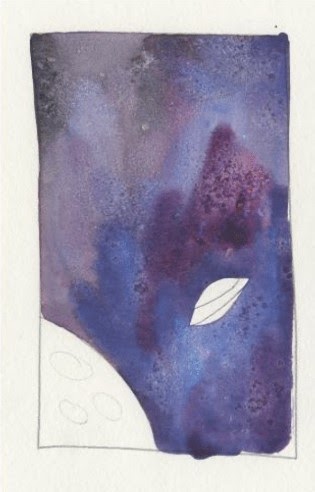
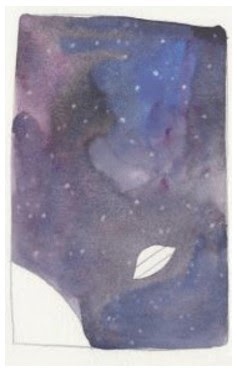
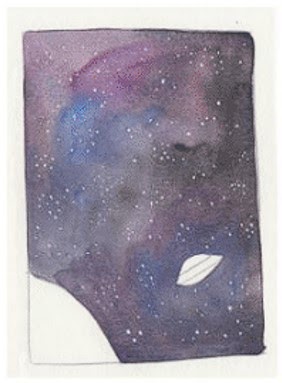
Here are some other breathtaking galaxy spaces painted by our young artists at Creativity School.
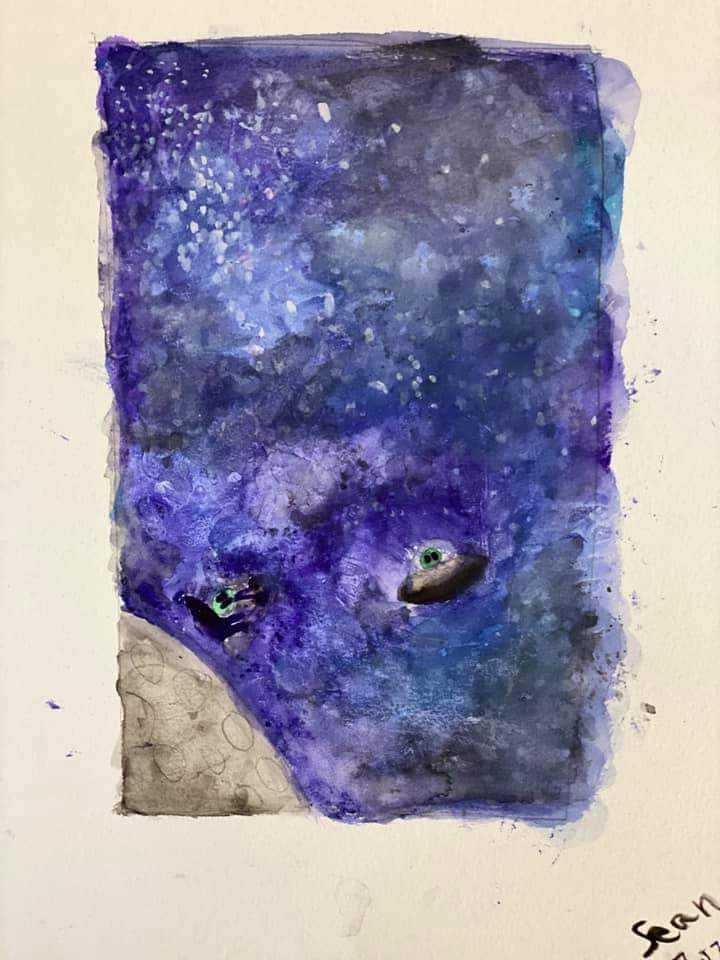
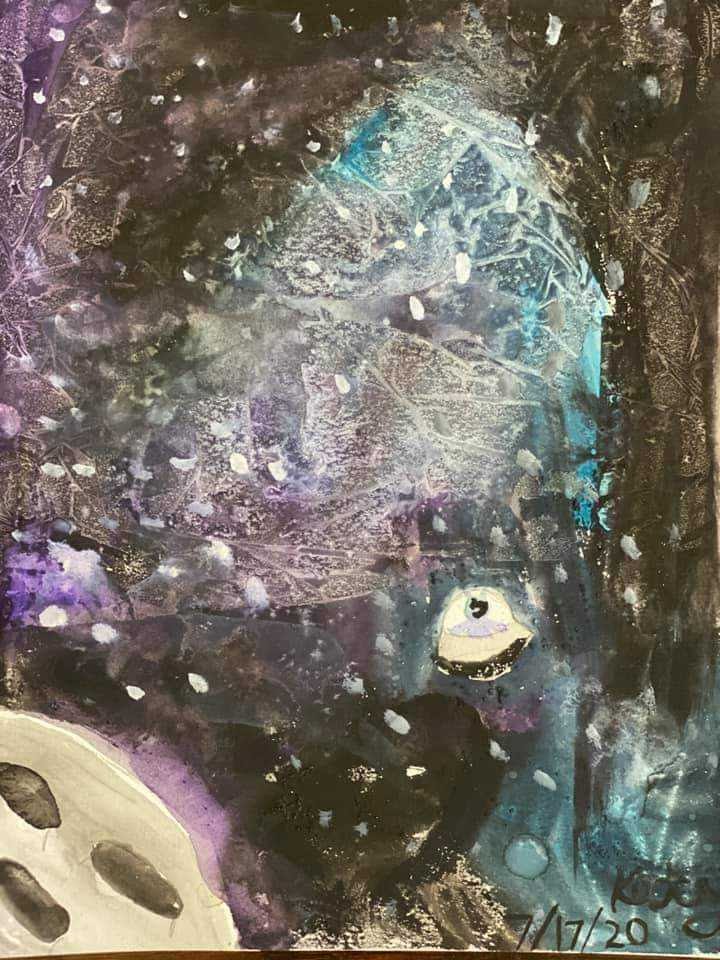
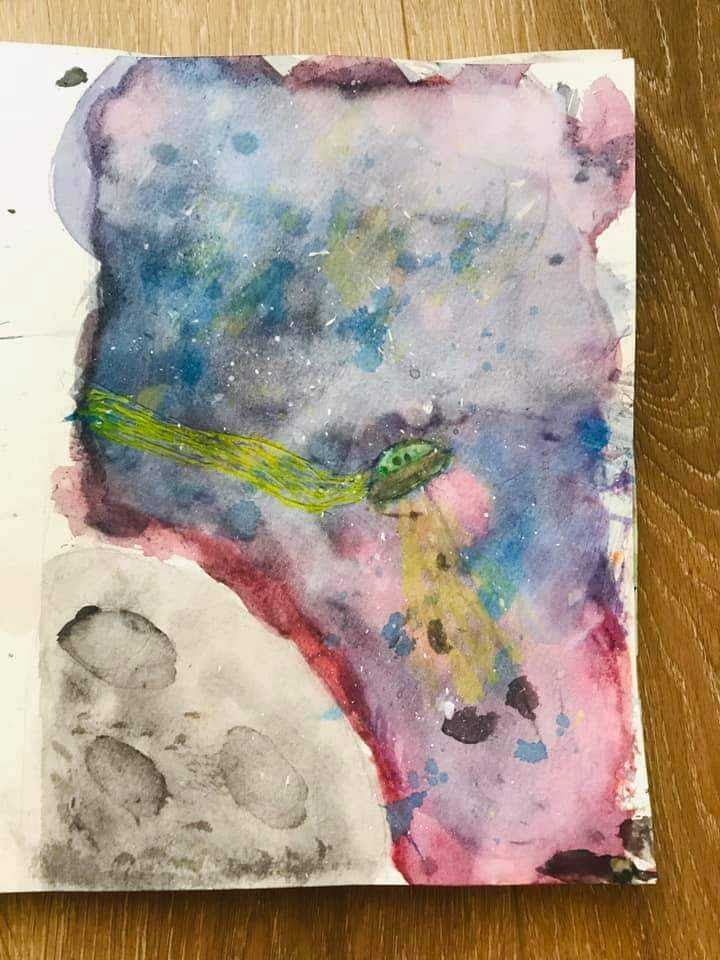

Artworks from Creativity School by Sean (top left), Kate (top right), Alina (bottom left), and Mikayla (bottom right)
Did you enjoy painting your galaxies? Share your thoughts in the comment section below.
Here are other fun painting lessons at Creativity School.
Creative Kids Live
- Celina G.
On Demand Class
—Miao